Nginx + Cloudflare Web Server Configuration On Raspberry Pi 4 (Part 3)

Hello back again all, previously we have configured cloudflare & SSL integration. In this part 3 we will have a lot of configurations in ubuntu. Before starting to make sure you have checked the steps below.

  • ISP router is already in port forward to your Server IP (Must open port 80 &443)
  • You can use DDNS for those whose ISPs use Public Dynamic IP (for example, Indihome ISP). if not you can see my previous tutorial about it
  • Make sure there is no firewall on your ubuntu that blocks ports 80 & 443

Ok I assume you have prepared everything and now you can turn on your Ubuntu Server and login Super User, just type sudo su in your terminal and login. After that we will start with the nginx webserver installation, for the installation you can use the command below.

apt update
apt install nginx

After the installation process is complete you can use the commands below to Stop, Start & Enable to make sure nginx is always running every time your server is turned on. For the Command, you can see below.

systemctl stop nginx.service
systemctl start nginx.service
systemctl enable nginx.service

Now your nginx webserver is already installed. If you are connected to the internet and get a Public IP (and make sure ports 80 &443 are open) you can immediately open the domain that you have integrated in Cloudflare in the previous part using your browser, If successful then the browser will display a welcome to nginx page as below.

if this page will appear it means it has been successful, your webserver is connected to the domain

If using a domain name can’t connect but using a Public IP can connect means that your Public IP is not connected to your domain in Cloudflare, you can enter the Public IP that you got from your ISP (Make sure your ISP provides a Public IP instead of a Private IP) and then enter the Public IP into your domain’s DNS settings in your cloudflare account (You can also use Cloudflare DDNS if the Public IP you get from a Dynamic type ISP). If it is still not connected, you can also troubleshoot by paying attention to the point point below.

  • Check the IP you got from your ISP instead of a Private IP
  • Check whether the port forwarding on ports 80 & 443 is already open, then what is the IP of your Ubuntu Server is the same as the IP settings in Port Forwarding
  • Check your Ubuntu Server firewall whether it is open port 80 & 443
  • Check your domain nameservers if they are connected to Cloudflare

Ok from here I assume your domain is already connected. Next we will configure nginx then install the database (here I use MariaDB) & PHP. We start by installing Maria DB as a database server, to install MariaDB you can run the command below.

apt-get install mariadb-server mariadb-client

After the installation process is complete you can use the commands below to Stop, Start & Enable to ensure MariaDB is always running every time your server is turned on. For the Command, you can see below.

systemctl stop mysql.service
systemctl start mysql.service
systemctl enable mysql.service

The next step we will install MariaDB, to go to the secure installation stage you can enter the command below and later you enter your root password.

mysql_secure_installation

After the question prompt appears, you can enter the answer according to the guide below.

Enter current password for root (enter for none): (Just press enter)
Set root password? [Y/n]: Y
New password: (Enter password)
Re-enter new password: (Repeat enter password)
Remove anonymous users? [Y/n]: Y
Disallow root login remotely? [Y/n]: Y
Remove test database and access to it? [Y/n]: Y
Reload privilege tables now? [Y/n]: Y

Ok the database has been installed, next we install PHP. For installation, you can enter the command below (the command in this bwah will install the latest version of the stable version of the verbaru version in the ubuntu repository).

apt install php-fpm php-mysql

Next we will edit the PHP configuration file. In this configuration has optimal settings for the wordpress CMS. Because in this project at least the scenario is that the webserver can’t run a wordpress CMS (because wordpress CMS is the most widely used). Then because we install the latest version you must first check what version is on your server then you can edit the configuration file, for the command you can see below.

ls /etc/php/
(after that it will appear directory version, to have me version 7.4 . you can replace it with the version you have)
nano /etc/php/7.4/fpm/php.ini
(After that replace some lines according to the configuration below)
file_uploads = On
allow_url_fopen = On
short_open_tag = On
memory_limit = 256M
cgi.fix_pathinfo = 0
upload_max_filesize = 100M
max_execution_time = 360

Ok done, for every time you change php settings.ini don’t forget to restart your nginx webserver. You can restart nginx with the command below.

systemctl restart nginx.service

The next step we just fill in the content & create a serverblock on our webserver. You can fill in with website content that you already have before or you can create a website from 0, you can also install your favorite CMS such as wordpress. For wordpress users, if you want to move your website you can use the WP duplicator plugin (in my opinion the easiest migration). Maybe I will make a tutorial in the next article, but in my experience it is easiest and move the full site with all the linked databases (this website is moved using the WP Duplicator plugin). OK, if that’s the case, you can enter your website content in the directory below

mkdir /var/www/namadomain.com
(your domainname changes your domain, then paste the website content in the new directory)
(Then run the command below to give the web server permission)
chown -R www-data:www-data /var/www/html/namadomain.com/
chmod -R 755 /var/www/html/namadomain.com/

Next for the last step we will create a serverblock on nginx to make the website content in the directory can be opened according to the domain name. On the serverblock, make sure the certificate pem key that we have stored in part 2 before is in accordance with the domain name. Ok to create a serverblock configuration file in nginx, you can run the command below

nano /etc/nginx/sites-available/domainname.com

after that paste the configuration below and replace it with your domain name & also replace php fpm with the version you are using.

server {
listen 80;
listen [::]]:80;
listen 443 ssl http2;
listen [::]:443 ssl http2;

server_name namadomain.com www.namadomain.com; 
root /var/www/domainname.com; 
index index.php index.html index.htm; 

ssl_certificate /etc/ssl/certs/domainname.com.pem; 
ssl_certificate_key /etc/ssl/private/domainname.com.pem; 
ssl_client_certificate /etc/ssl/certs/origin-pull-ca.pem; 
ssl_verify_client on; 

client_max_body_size 100M; 

autoindex off; 

location / { 
    try_files $uri $uri/ /index.php?$args; 
} 
location~.php${ 
     include snippets/fastcgi-php.conf; 
     fastcgi_pass unix:/var/run/php/php7.4-fpm.sock; 
     fastcgi_param SCRIPT_FILENAME $document_root$fastcgi_script_name; 
     include fastcgi_params; 
} 
}

After saving the configuration file above, to enable the above settings you can run the command below

ln -s /etc/nginx/sites-available/domainname.com /etc/nginx/sites-enabled/
systemctl restart nginx.service

And finally done, your domain and website content have been online on the internet. You can check directly in the browser by entering the domain name you set in this tutorial 🙂

How to Open Port 80, 443, 22 Firewall Ubuntu 20.04 With UFW

Hello everyone, maybe you already know that every time you install Ubuntu 20.04 it is included with an application firewall called UFW (uncomplicated firewall) which by default it has been disabled. Well, in this article, we can use UFW to protect our PC / Server and only open certain important ports such as port 80 (webserver), 443 (SSL webserver) and 22 (for remote SSH). Okay, let’s get started, but before you do. you can first check your UFW status whether it is active or not with the command below:

ufw status
or
ufw status verbose

next to enable ufw, enter this command below
ufw enable

1. Web Server

To open port 80 (HTTP)

ufw allow http
or
ufw allow 80

To open port 443 (HTTPS)

ufw allow https
or
ufw allow 443

(Optional) You can also set the webserver to only be accessible by certain IPs or also only open certain ports such as TCP / UDP. For example, you can see below

only open port 80 with the TCP protocol only
ufw allow 80/tcp
only open port 80 on certain IPs (e.g. 192.168.77.22)
ufw allow from 192.168.77.22 to any port 80

2. SSH

To open port 22 (SSH)

ufw allow ssh
or
ufw allow 22

(Optional) You can also set SSH to only be accessible by certain IPs as well as above (usually I set according to the local IP connected to the network, so that it cannot be accessed on the internet)

only open port 22 on certain IPs (for example 192.168.77.22)
ufw allow from 192.168.77.22 to any port 22

3. Other Custom Ports

  • FTP: 21
  • Telnet: 23
  • Winbox: 8291 (mikrotik)

(TIPS) And then the last one, for example, you made a mistake and want to delete the firewall settings that you have made, you can use the command below.

command to see all the rules
ufw status numbered

then there will be a number on the left, and you can delete the rule according to the number listed. for example you want to delete rule number 2 you can use the command
ufw delete 2

Nginx + Cloudflare Web Server Configuration On Raspberry Pi 4 (Part 2)

Hello, welcome to part 2, make sure you have seen part 1 before going to this stage. At least you already have a domain that is already connected to your Cloudflare dashboard. Ok, right off the boat, for part 2 this time we will configure Cloudflare SSL, Optimization to security. Then you can open your domain that connected to the Cloudflare dashboard and on the menu click the “SSL / TLS” tab as below:

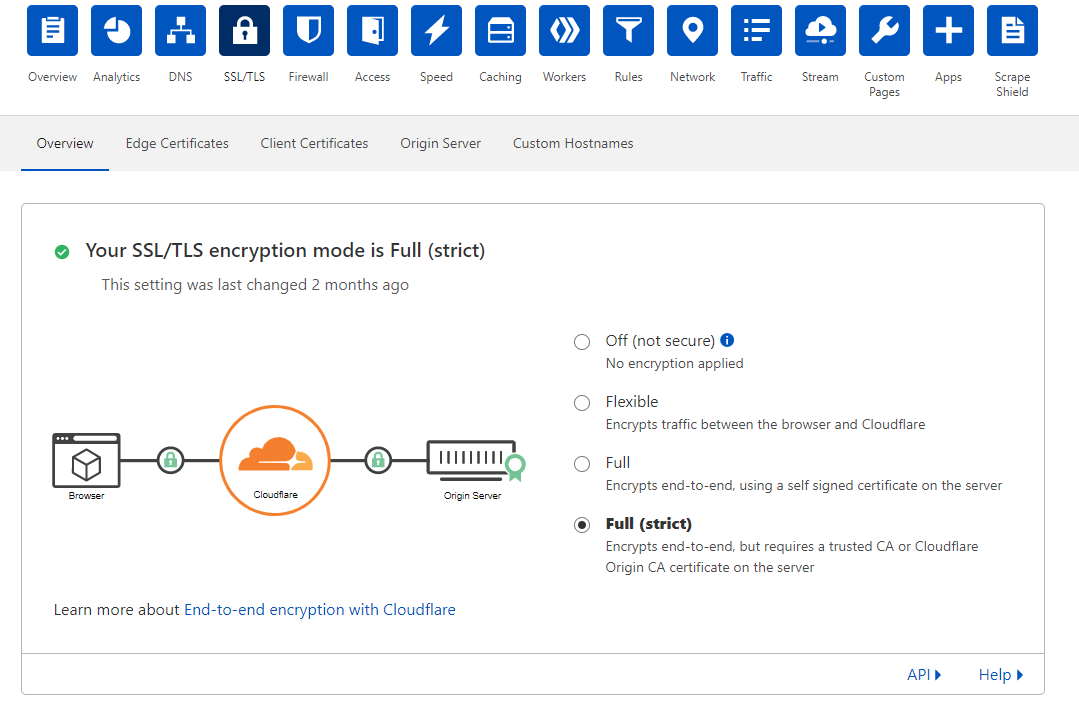
In SSL / TLS settings select Full (strict) for best security

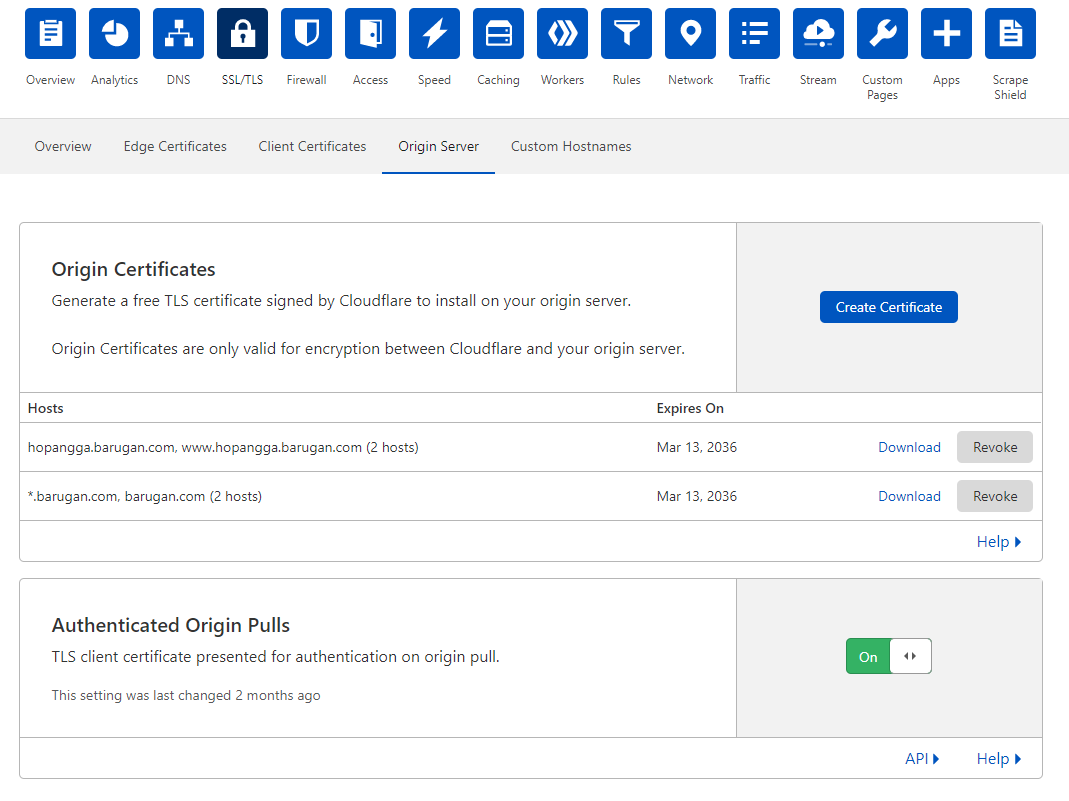
In the SSL / TLS settings select Full (strict). Here we will send and receive data from encrypted from Cloudflare for best security, avoiding sniffing and spoofing on our local network. And also Cloudflare will encrypt the data to the browser connected to Cloudflare so that the data is more secure. For this method we need an origin certificate from Cloudflare which we will later install on our webserver later, you can download it in the SSL / TLS tab > Origin Server as shown below:

here I have made it before for this web, you can create a certificate if there is no

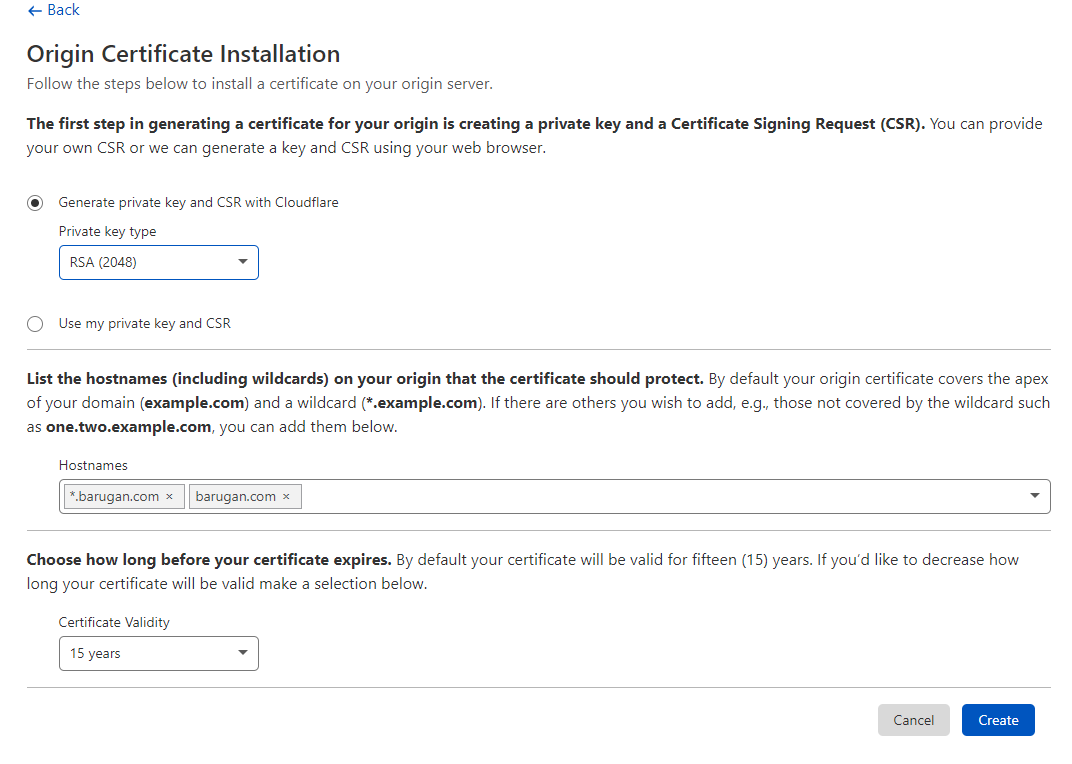
As shown above I have activated for my 2 domains. Before creating a certificate, don’t forget to turn on Authenticated Origin Pulls and after that you can click create certificate and a display will appear as below:

Choose RSA (2048), the domain you want & certificate validity is up to you

Furthermore, for the private key type, select RSA then in the Hostname list here will automatically apply SSL to your domain, for default he will apply to the main domain and first-level subdomains (sub.domain.com will use SSL but not sub.sub.domain.com). Furthermore, the certificate validity is up to you, I am going to use 15 years so that I don’t change the SSL certificatefor 15 years. When everything is done, you can click on Create then Cloudflare will generate 2 certificates which we will have to save later. For example, as shown below:

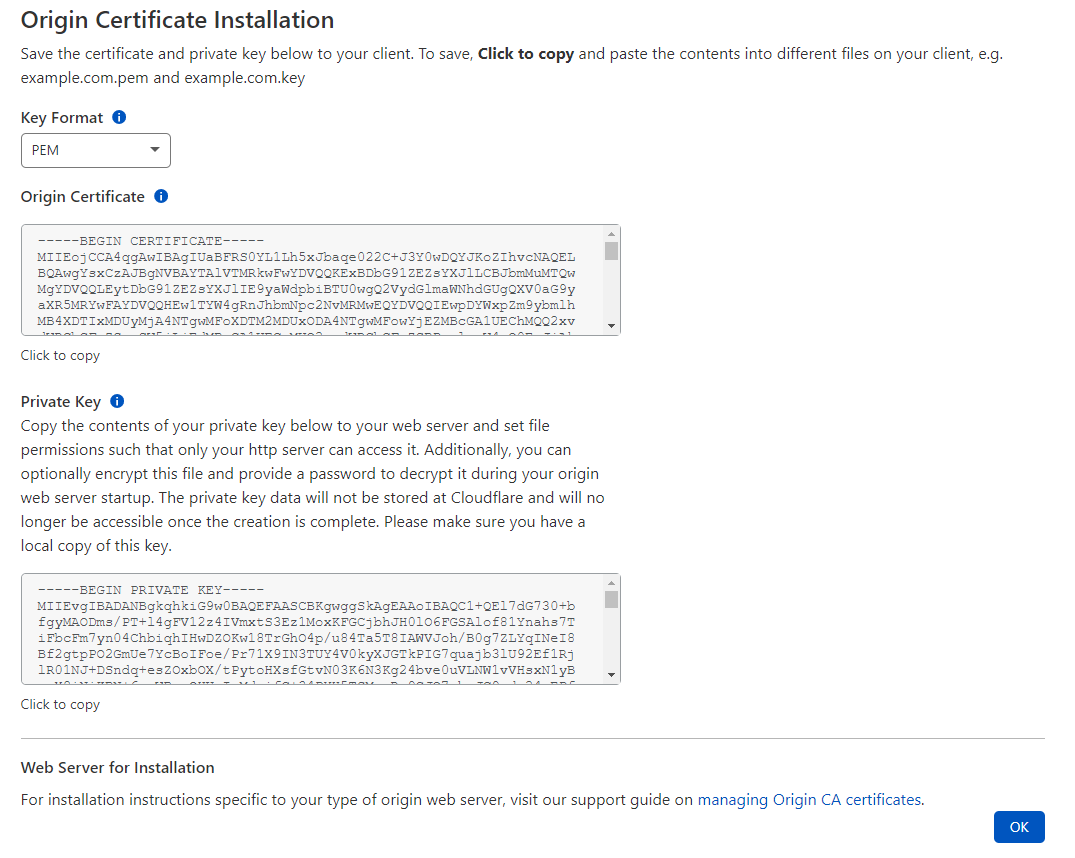
Cloudflare will generate origin certificate & private key

After you find the display above, don’t rush to the close because we have to save the two certificates. Make sure the Key Format is in PEM form for the certificate. Maybe you can first save all these certificates as backups later, then you can start turning on your Raspberry Pi 4 which has installed OS (for me, I use Ubuntu Server 20.04) and Login Super User then we can start implementing SSL to our webserver.

  1. For Origin Certificate you can save it in the directory /etc/ssl/certs/ , with the file name = domainname.com.pem
    Easier: nano /etc/ssl/certs/domainname.com.pem
    then paste the Origin Certificate
  2. For the Private Key you can save it in the directory /etc/ssl/private/ , with the file name = domain name.com.pem
    Easier: nano /etc/ssl/private/domainname.com.pem
    then paste the Private Key
  3. Then for the last step since we enabled Authenticated Origin Pulls, we have to download the Origin Pulls Certificate. You can search in this URL with the file name origin-pull-ca.pem and enter it in the directory /etc/ssl/certs/
    It’s easier:
    cd /etc/ssl/certs/
    wget https://support.cloudflare.com/hc/en-us/article_attachments/201243967/origin-pull-ca.pem

Next we will change all incoming requests using HTTPS, and for that we have to enable Always Use HTTPS & Automatic HTTPS Rewrites on THE SSL/TLS > Edge Certificate. You can see the example image below:

Enable Always Use HTTPS
Enable Automatic HTTPS Rewrites

And finally finished for the Cloudflare integration problem & SSL Certificate men. Next, we just have to configure the Ubuntu Server to connect to cloudflare CDN. So here I end Part 2 here, and for part 3 later we will fully use our Raspberry Pi 4 so make sure you are ready. You can remotely use SSH or directly configure it later, and oh yes, make sure your router has you port forwarded to your rapberry pi and have opened ports 80 & 443. Ok, if you see you in part 3, friends 🙂
Nginx + Cloudflare Web Server Configuration On Raspberry Pi 4 (Part 1)

Hello all, in this article I will share my experience of configuring a webserver using raspberry pi 4 (a continuation of the past article). Ok for our webserver this time will use Cloudflare + Linux Ubuntu Server 20.04 (or above it may still be possible) with raspberry pi 4 which is connected to a direct boot USB SSD / NVME (if you miss it can see this article). Now the next equipment that you can prepare in this project includes:

  • Raspberry Pi 4 with Ubuntu Server OS 20.04 (or another version if you decide to use other varian of linux) then you have to download and install it tutorial can be seen here
  • ISP routers that are already in port Forwarding 80 & 443 (if you use indihome)
  • SSD/NVME along with USB adapter connected to raspberry pi 4 in USB 3.0
  • Domain Name (can .com .net .info etc. freely)

Ok, let’s get started, here is the webserver that we will set up using Cloudflare as a CDN. Because Cloudflare provides a CDN for free that can speed up the performance of our webserver. The first time if you don’t have a cloudflare account you can register here and if you have logged in, you have to add the domain you already have in Cloudflare and connect it as the example below.

click on + add site, to add a domain

After clicking on the add site, a display will appear as below to enter your domain

enter your domain name in the form and press add site afterwards

If you have finished entering the domain then you will be faced with a pricing table as below, for this project you choose a free plan as shown below then click continue after it is finished

select free plan (bottom) and then click continue

next Cloudflare will import your DNS settings in the domain that is currently in use, so that when you change the nameserver to cloudflare your domain is still online and points to the same DNS. For this stage you can just let it go or edit it if you want to change the host, after that you click continue until you are on the page as shown below.

at this stage, you can change your domain server name and point to Cloudflare’s NS

After that, at this stage you have to change your domain nameserver to a cloudflare nameserver to connect your domain to the Cloudflare CDN. In this step, it won’t make your website down anyway, because Cloudflare has imported your domain’s DNS settings before. To change the nameserver you can change on your domain manager, for example, I bought this domain at namesilo and then I have to change it through namesilo. You can see an example below.

this is the nameserver setting in namesilo, you can change according to where you registered the domain

After you have finished changing the nameservers according to the page in Cloudflare then you can click “Done, check nameservers”. Nameserver switching usually takes 1×24 hours depending on the policy of the domain refgistrar you are registering for, but usually it takes more than a few minutes to hours. Ok, if it is complete and successful then your domain will appear on your Cloudflare dashboard with a green check mark as shown below.

if it has appeared on the Cloudflare dashboard like this, then your domain is successfully connected

Ok here we have finished connecting the domain to Cloudflare and we can continue in part 2 because it is quite long if it is made into 1 post. Part 2 will include configuring Cloudflare and activating the Cloudflare SSL feature for your domain. You can proceed to part 2 by clicking below.

DDNS Configuration Cloudflare DDClient Ubuntu 20.04 Free

Hello everyone, have you ever had trouble having an ISP with a dynamic IP public? Yes, I’m one of them back then but it’s not anymore since I activated Cloudflare Free DDNS.. hahaha. To use this, you are required to have a domain connected to Cloudflare (using the cloudflare nameserver) after it we can use the API from Cloudflare, to change our IP in Cloudflare so the IP will be the same as the linux server we use (we use DDClient, and this is the linux package). For this project, what I use is:

  • Ubuntu Linux server 20.04 (other Linux can do it too, as long it can install DDClient)
  • Indihome ISP (Other ISPs is able to use this too, as long it had Dynamic IP)
  • Domains that are already connected in the Cloudflare account (name server point to cloudflare)
  • The router is already Port Forwarded to server (I happen to use the F609 type)

Ok, let’s just start with that, first make sure you have opened the linux terminal on your computer. Furthermore, also make sure you are already a Super User in the terminal, if you don’t know you can type sudo su in the terminal and enter your respective passwords (if your using one). Well after that we will start the installation and i assume you guys use Ubuntu 20.04 as well (if you using other varian of linux, the command depend on the respective OS). Ok for the DDClient installation you can enter the command below:

apt install ddclient libdata-validate-ip-perl

Well, wait until the installation is complete, and when it’s finished we need to patch it with the latest version. Maybe someone asks why it should be patched? because the DDClient in the ubuntu repository is already deprecated version & also it does not support the DDNS API from Cloudflare so we patch it with the latest version. Ok, for the command, i will using wget (you can use other tools too, as long you get the files).

wget https://github.com/ddclient/ddclient/archive/v3.9.1.tar.gz
tar -xf v3.9.1.tar.gz
cp v3.9.1/ddclient /usr/sbin/ddclient
rm -rf v3.9.1.tar.gz ddclient-3.9.1/
mkdir /etc/ddclient
mv /etc/ddclient.conf /etc/ddclient/

Ok now you have finished patching, then you can edit the DDClient configuration file in the directory below (I use nano, you can use another text editor as well as you want)

nano -w /etc/ddclient/ddclient.conf

Now if you have opened it, you want to be able to use Cloudflare DDNS, you are required to have an API token from Cloudflare. To request the API Key, you can click this link: https://dash.cloudflare.com/profile/api-tokens . Now from there you can create tokens. An example of the picture is kek below gan.

if you have opened the cloudflare url above, there will be this display. just click Create Token

Now if you have clicked Create Token we will be faced again to what to create api for. Now because here we want to be able to change the IP to the domain using the API as a link, we need an API that can edit the dns zone in Cloudflare in real time. There is already provided the template directly from Cloudflare, we just select the Edit DNS zone and click on Use Template. An example of the picture is below.

we need an API to edit DNS so we select the Edit DNS zone yak

Well when it’s done we are faced again on another page. Here we just need to include which domains we want to use this API. If I use it for all my domains on Cloudflare, so I choose all zones (you can adjust it to what you want). for contah the picture is below.

just edit in the include zone, here my API can edit all zones (Include All Zones)

After you finish creating, an API key will appear and then you save it to notepad or where it is (because it only appears 1 time this time, so you should keep the API Key good). After you simplify, this API key will be needed for the DDClient configuration so don’t lose it first. Ok we’re done with the API Key, next we go back to the terminal again and we open the DDClient configuration file. Here I use nano to open the file (you can use another tool jg). Open the DDclient configuration file directory in the following way.

nano -w /etc/ddclient/ddclient.conf

After you open it, there will be a default configuration of the DDClient. You can cheat on my configuration that I tested myself working stable (I’ve been using it for almost 4 months) and it’s still working now. For the configuration later, you just need to change the domain name with yours & also your API Key. For an example of the configuration, you can see below.

# Configuration file for ddclient generated by barugan
#
# /etc/ddclient.conf
# How offten to check ip address
daemon=360
# Using Cloudflare protocol
protocol=cloudflare
# Tell ddclient to get real ip address
use=web, web=checkip.dyndns.org
# Credentials for Cloudflare api
ssl=yes
server=api.cloudflare.com/client/v4
[email protected]
password=(fill in API Key Here)
zone=domainname.com
# Domain for namadomain.com update
, *.namadomain.com

So that’s the DDClient file settings. There you can see that there is a daemon = 360, so the max DDClient will refresh the IP every 360 seconds or 5 minutes. You can set the daemon time as you want too (but ane suggest 5 minutes is not bad anyway). Well here we have finished for all the configurations & it’s time to test whether DDclient is already running as we want. To get rid of it, you can use the command below.

ddclient -daemon=0 -verbose -noquiet

If it is already run, it will appear whether the update is successful or not. If successful, there is usually a success letter as shown below.

deliberately censored gan, but the point is that if it is successful, it looks like that, yes

Now if you are successful, you can check whether the DDClient is already running in the background or not. To check the status, you can use this command.

service ddclient status

Well, later, if you run, an Active (Running) display will appear. But if it is not active, you can restart the DDClient with the ddclient restart command service . For an example if DDClient is already active, you can see the image below.

if it’s already running, it means it’s been successful.

Ok, so that’s how to use free DDNS from Cloudflare and hopefully it will be useful for you 🙂

How to Port Forwarding Indihome Router ZTE F609

Hello, for those of you indihome users, you may already know that indihome provides a public ip to its customers even though it’s a dynamic type that changes. Even so, we can still take advantage of it by using DDNS to anticipate the dynamic Public IP. Well, it’s the dynamic IP problem, in this article there is a way to open a certain port for a specific IP using the Port Forwarding feature on the router (in this case, I give an example of the F609 type). By opening the port on the router we will be able to be accessed by the internet to be able to activate the service according to the port opened.

Examples of frequently used service ports:
– FTP: 21, 20
– SSH: 22
– Winbox: 8291 (Mikrotik)
– Web HTTP: 80
– Web HTTPS: 443 (SSL)

– Telnet: 23
– Mail SMTP: 25
– Mail POP3: 110
– Mail IMAP: 143
– NTP: 123
– PPTP: 1723

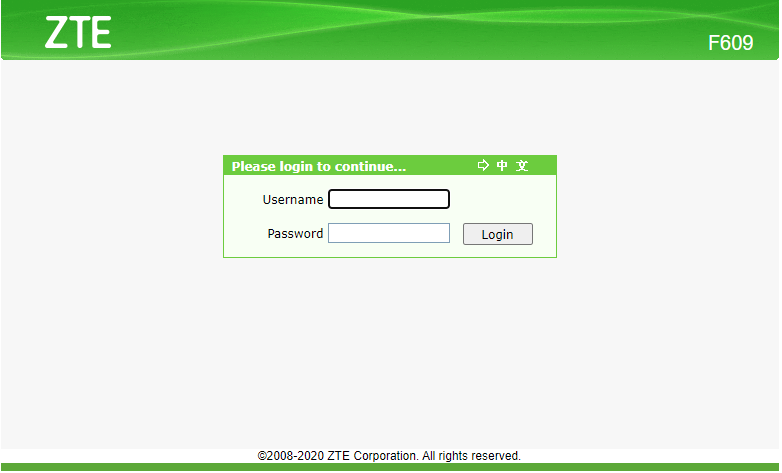
Furthermore, if you already know the port service you want, we will continue to port forwarding, for this time I will use a router modem from indihome type ZTE F609 (incidentally that’s what I use). Ok, next, to log in to the router, you can use a cellphone / laptop / PC that is already connected to the router, either using a lan cable or using WiFi. If you are already connected, enter ip 192.168.1.1 in the address bar as shown below.

After that, enter the username and password, usually if it has not been changed you can enter the credential below:

Username: user
Password: user

Username: admin
Password: Telkomdso123

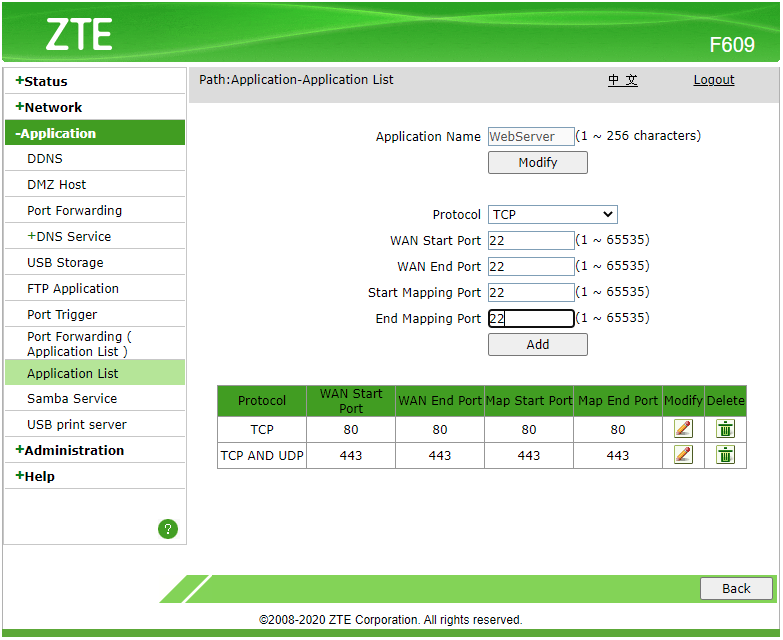
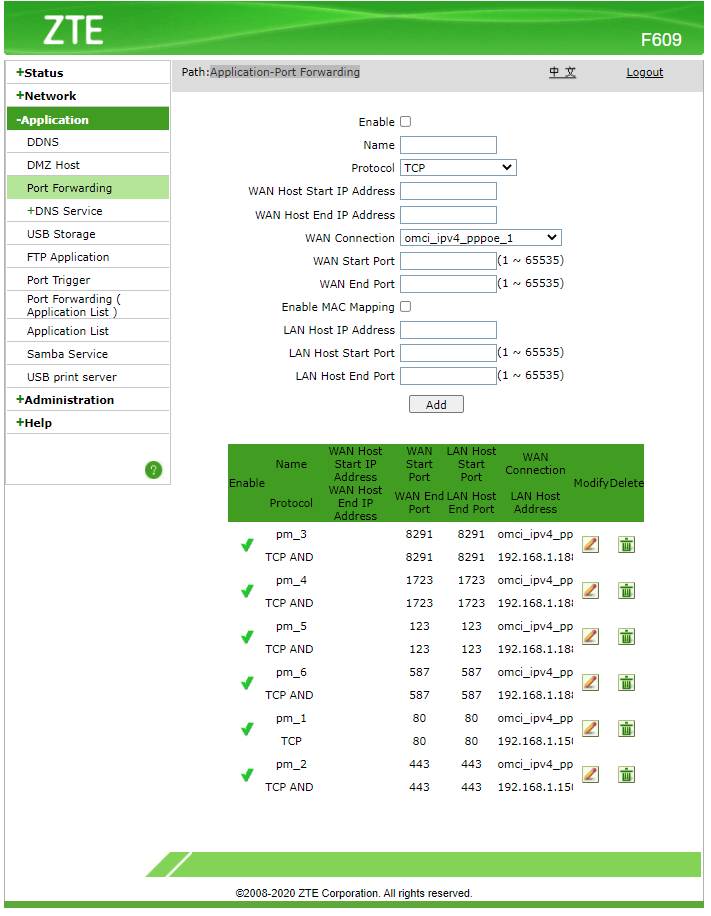
After logging in you will be redirected to the webfig from the router. Go to the Application tab > Application List > Click here to add an application. Then next you will find the display as below:

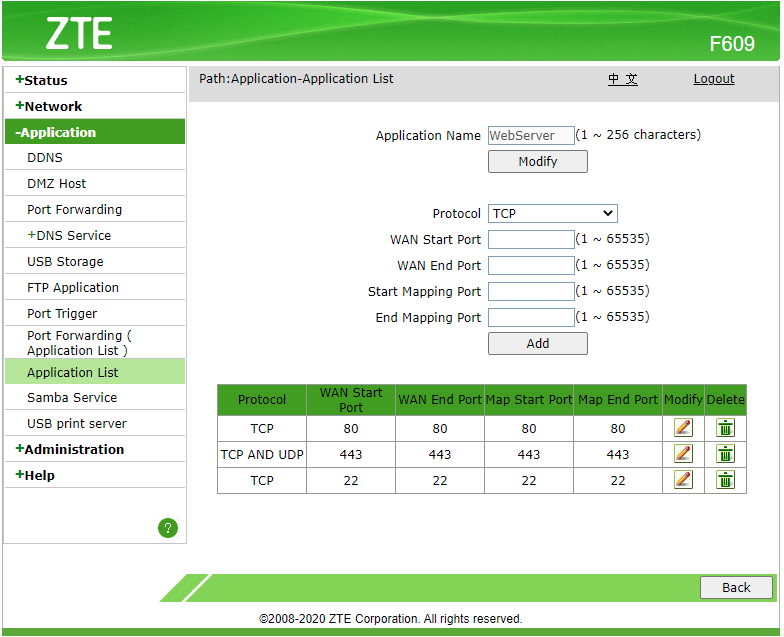
From here you can enter the Application Name (free of contents), if it is on me because I want to use for the webserver then I open port 80 and port 443. And as above I want to open port 22 for SSH, then I enter port 22 in the field above (you can fill in the port according to the service you want to use). After finishing pressing the add button, the port settings will appear in the table below as shown below.

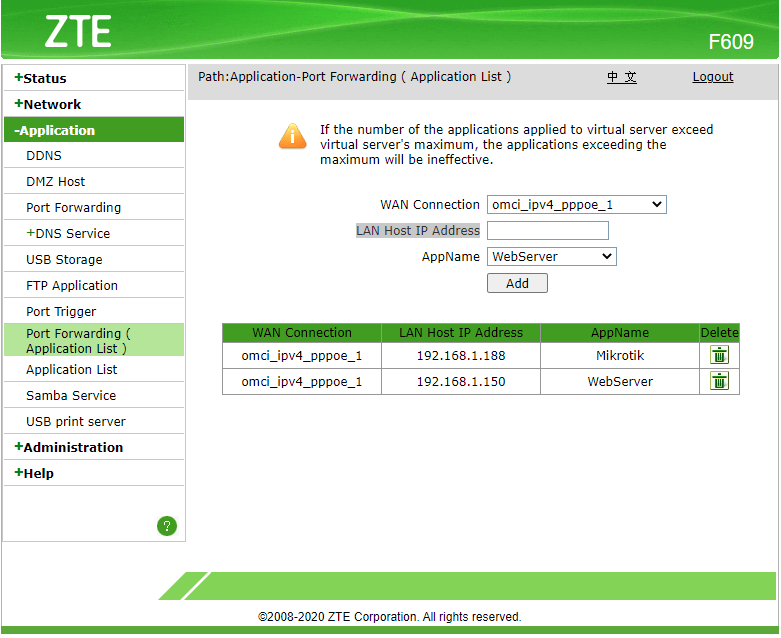
After finishing opening the port on the Application List, then we go to the last stage, which is to apply the Application List to the IP we want. So for example, if we install a webserver connected to the router with a Static IP of 192.168.1.150, then we have to apply it to the Application List with the port that we created earlier (if on my port 80, 443, port 22 I deleted it because just make an example of it) to IP 192.168.1.150. With the example below, you enter the IP that you want to open the port in the LAN Host IP Address and then in AppName select the Application List that you have created then click Add. For example, as shown below.

Ok now you have finished opening the port on the IP you want. For the last stage, we will check whether the rule is active or not. We can see it on the webfig also on the Application > Port Forwarding tab. If it is active, there will be a green tick on the left side followed by the rule you have created. For an example of how it looks, you can see it in the image below.

Well as you can see, the port opening rule is already enabled (in my case it is 192.168.1.150). So that’s how port forwarding if you use an indihome ISP with a ZTE F609 router. If you use another router, maybe it can also be applied with different webfig settings. In the other hand, if you understand the concept, it is more or less the same for its application, so you don’t have to worry. Ok that’s how Port Forwarding on ZTE F609!

How to Direct Boot USB SSD/NVME Ubuntu Server 20.04 Raspberry Pi 4

Hallo Men, when searching for this article, it means that you are planning to use an SSD or NVME on your raspberry and you are now on the right path. Actually, maybe you know that we can use an SSD for OS with Berryboot as an OS selector when booting but for this article it’s different we will directly boot into SSD / NVME via USB without Berryboot intermediary or use a loader in micro SD so it’s more native (in my opinion anyway). So in this tutorial, you don’t need a Micro SD at all and what you need is an SSD / NVME (HDD will be ok too, but only powersupply attached) and don’t forget to use a USB adapter / converter to connect SSD/HDD/NVME to your Raspberry Pi 4 (recommended USB Version 3.0 or above).

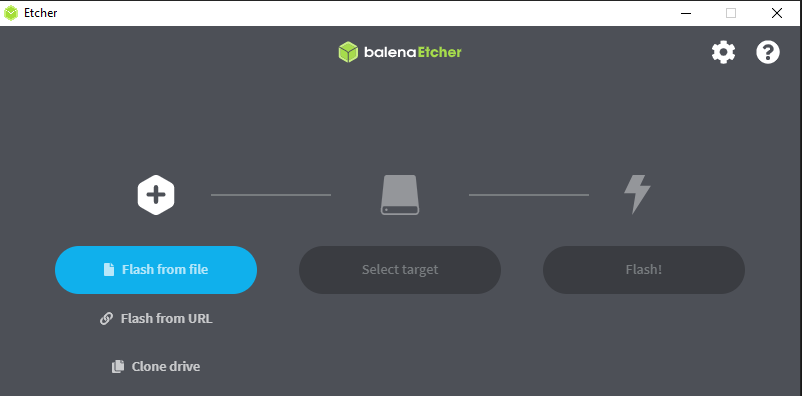
Ok, let’s keep going, it’s actually really easy to do it. First of all, you will beed to download the disk flasher first, what i use here is balena etcher you can download it here and for the Ubuntu Server 20.04 direct boot ISO image in this link download it here (or this the forum link that provide it). after you open the link, download the flasher and iso ubuntu 20.04 , and when you are finished, just open the flasher. then there will be a display like below.

After that, select flash from file then select the Ubuntu Server 20.04 ISO that you downloaded earlier and then in the target select enter the SSD / NVME that you want to flash with the ISO image. After that, in the last step, you just click flash and wait for the loading to finish.

After the flashing process is complete, plug your SSD / NVME with the adapter in raspberry via USB 3.0 for maximum performance. Wait a few moments then booting will continue to the Ubuntu Server terminal (you can also access the terminal via SSH on port 22). Next to login in the terminal you can enter the username: ubuntu, password: ubuntu.

Congratulations on successfully installing Ubuntu Server 20.04 on Raspberry 4 😀

Raspberry Pi 4 Experiment Experience (Version 4B) For Web Server

Hello everyone, this time I want to share your experiences that are also related to this website. Okay, let me tell you right away, this all started when I watched the eta prime youtube channel where he used raspberry pi 4 for the web server and I was interested in it (I also manage 3 websites) and I watched it until end. From there I was really interested in raspberry pi & I researched it. After that i find is very useful for nas server, plex server, pi hole and be used as mini PC (so awesome).

After that came the experiment to create a web server for 3 domains that I manage (i don’t want pay hosting monthly fee.. wkwk), because of my isp have public dynamic IP and mostly my internet is not use at my home, just for cctv.. hahaha (fyi: im not pay for internet, my brothers pay it). After that i manage to save some money to buy my beloved raspberry pi 4 but before that already buy the accessories first like passive cooling heatsinks & adapters (because they were sold separately, when I rolled).

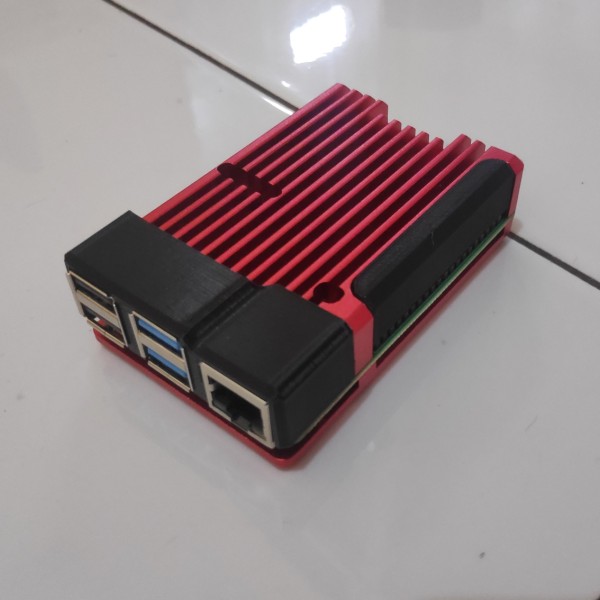
Then my money had accumulated and finally I bought the item at the online marketplace (fyi again: I bought it at the price of the 40$ & after I bought the price went up. hehe). Timeskip a few days & when it rained heavily, the courier came with the package with his raincoat (thanks, mr. courier anteraja, anyway im using free shipping). Immediately opened the package – I realized how compact this raspberry pi board is, I immediately put a thermal pad (I put thermal paste too) then I put the passive cooling heatsink. And to my surprise, it was really cool to be.. Haha. you can see what it looks like in the photo below.

raspberry pi 4 sighting with passive heatsink, uda wear gpio cover also 3D print

Well, how cool is it. Ok, I also went to the next stage, continue installing the OS and just before I was prepare the iso file for the raspberry flash and I found 2 ways, the first one using berryboot & the second using direct booting USB. After I tested both for a few days I also decided to directly boot the USB to the SSD and use ubuntu server 20.04 OS. The OS was installed next according to many tutorials that I got, I started experimenting for the webserver engine. Actually, I have installed openlitespeed but because of the support (actually the software is messed for arm version, i hope there had update in the future, I also hate to bother with the bugs) I finally used the nginx + Cloudflare webserver.

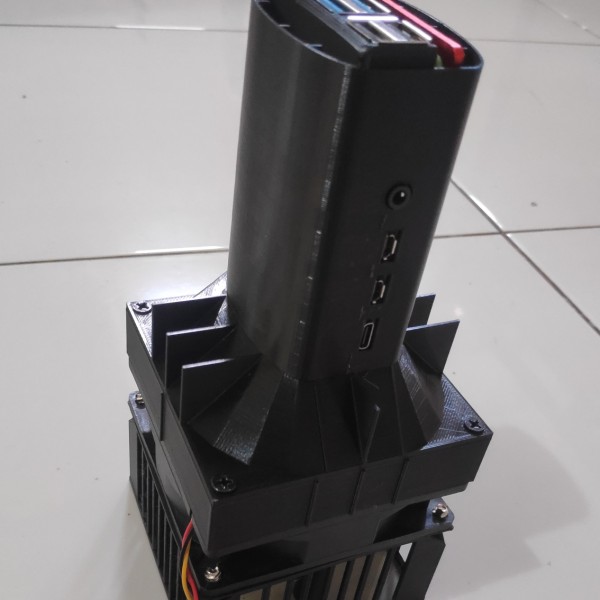
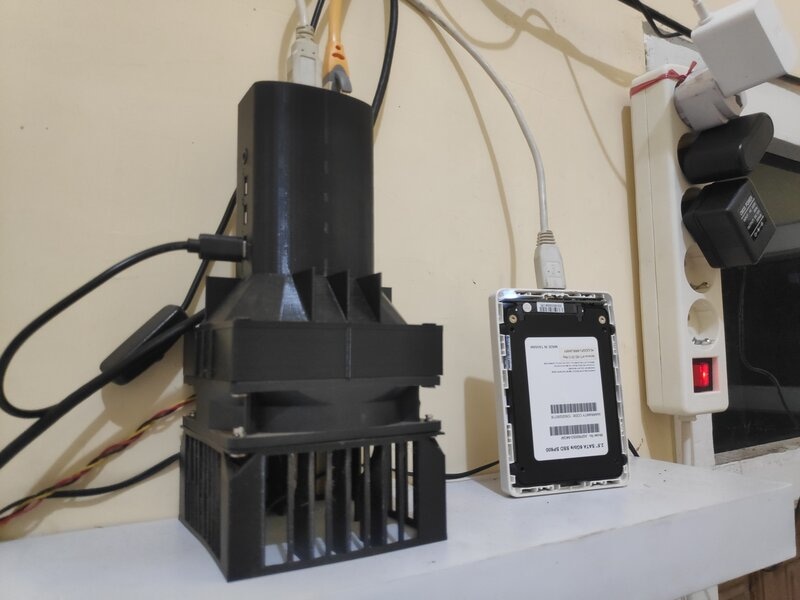
After a few days ane decided to make a 3D printing case using a 90mm fan

I start configuring everything from the firewall to the web panel (here use webmin). if you’ve ever hosted vps, the configuration is more or less the same anyway. FYI again, you guys for this website are now already hosted on my raspberry pi 4B so you can feel for yourself how the performance is (in my opinion, the bottleneck is just on the ISP, the upload speed is only 10mbps). Everything is not smooth as i planned, there is problems when making this server can run 24/7 at home, the problem I encountered is:

1. A dynamic ISP IP that changed to another after a few days but this can be solved with DDNS (I used DDCLIENT on ubuntu that I connected to Cloudflare)
2. When the server power failure & internet is off (can be solved by using a UPS, already buy one UPS now)
3. When the power failure / restart the ISP router sometimes can be a Private IP which becomes the server cannot be accessed via the internet but can be overcome by restarting the modem solution until I can get a Public IP or bridge the ISP router with a mikrotik using the REDIAL PPPoE auto script so that if I get a Private IP mikrotik automatically redial until I get a public IP (I myself use a proxy but only for notifications if the IP changes, then it will send an email to me)

the final result of the raspberry pi 4 webserver has been running 3 months since the article was created

Oh yes, for those of you who want to try to make a DIY webserver project, this is also what I will prepare in the next article, I will try to share my configurations from os installation, ufw firewall configuration, webserver configuration, webmin, ddns configuration (incidentally using a isp whose ip is going to change), and also cloudflare ssl. For this article, just share my experience when I want to make a webserver, anw hope you guys find it useful.. Hehe.